Sunday, August 29, 2021

Hello and Welcome!

Welcome to today's blog post! I am excited to share the second in my four part series focused on the new Gorgeous Leaves bundle.  Today was all about #simplestampin.  I pulled out some paper, stamps and ink and had a grand old time! 

And here is today's project...


This stamp set arrived just in time for fall and we are so ready for some fall weather here in Texas.  This card started with a base of Very Vanilla and was so simple to put together.  Thanks to the Stamparatus I was able to produce a good number of these cards pretty quickly to add to my stash of "Thinking of You" cards.  Using the largest leaf, stamp in alternating colors and in alternating directions.  Can't go wrong with #simplestampin.

Check out some close-ups below.  While I decided to leave the inside of today's card blank don't forget you can always add some extra coordinating stamps or sentiments...


Card Details
Size: 4 1/4" x 5 1/2" 
Paper: Very Vanilla
Stamps: Gorgeous Leaves, A Touch of Ink
Inks: Bumblebee, Early Espresso, Terracotta Tile, Crumb Cake
Tools: Not today :)
Accessories: Keepin' it simple!


Keep Austin Crafty!
------------------------------------------------------------------------------------------------------------------------

Did you like today's post?!  If so, don't forget to...
  • Leave a comment below! I love to hear your thoughts on the day's project!
  • Want to purchase any of the items used in today's project? Pop on over to my online store using the link on the right! 
  • Follow me on Pinterest.
  • Check out my Etsy Shop.  
Sunday, August 22, 2021

Bundle: Gorgeous Leaves

 Hello and Welcome!

Welcome to today's blog post!  After a short break to get this family settled for the start of school, I'm back to showcase the beautiful Gorgeous Leaves Bundle.  This set has some gorgeous die-cuts and the stamp set is lovely.  

I am also excited to announce a new program planned in partnership with the Bee Cave Public Library.  Scheduled for November 2021, you can come out and learn more about stamping and cardmarking as part of the "What's New Wednesday" program.  Check back as we get closer to the program date for more details.  

The layout for today's project was inspired by the Stampin' Pretty Sketchbook #28.  You can check it out here.  

And here is today's project...


You can never go wrong with a color combination of Crumb Cake and Night of Navy and today's card is no exception.  I love the colors of fall and I think the pop of Terracotta Tile really makes this card.  Today's card features a cluster of cut outs made with the Intricate Leaves die-cuts.  Those pieces were secured using Stampin' Up! glue dots and the sentiment was popped up using Stampin' Up! mini dimensionals.  Add a small bow of twine and some gold sequins for the finishing touches. 

Don't forget the inside of your card either! 


Card Detail
Size: 4 1/4" x 5 1/2"
Paper: Basic White, Crumb Cake, Night of Navy, Terracotta Tile, Early Espresso
Stamps: Gorgeous Leaves, A Touch of Ink (sentiment)
Ink: Crumb Cake, Night of Navy
Tools: Intricate Leaves die-cuts, Stitched Shapes die-cuts, Banner Punch
Accessories: White twine, Gold sequins

Marley's Corner
-----------------------------------------------------------------------------------------------------------------------

Check out another edition of Marley's corner below.  It's been awhile since we've seen a one-of-a-kind Marley creation, so she wanted to share today's card featuring "love and flowers".  


Keep Austin Crafty!
------------------------------------------------------------------------------------------------------------------------

Did you like today's post?!  If so, don't forget to...
  • Leave a comment below! I love to hear your thoughts on the day's project!
  • Want to purchase any of the items used in today's project? Pop on over to my online store using the link on the right! 
  • Follow me on Pinterest.
  • Check out my Etsy Shop.  

Sunday, August 1, 2021

Card: Give Thanks

Hello and Welcome! 

Welcome to today's post! I am excited to share the final installment in my tour through the Arrange a Wreath bundle.  Today's project takes a little detour from the wreath focus and showcases some of the other stamps and dies in this lovely set.  Take a look below! 

And here is today's project...


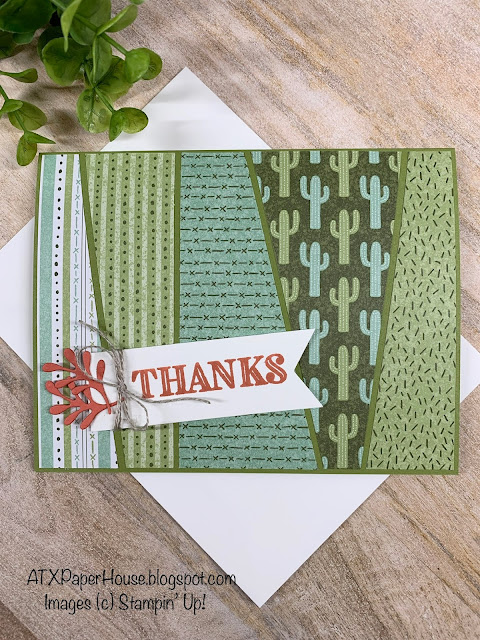
I decided to give the new Harvest Meadow DSP a try as the focus point of today's card.  This beautiful DSP has a beautiful mix of colors.  Today's card is paired with Bumblebee, Evening Evergreen and Crumb Cake ink.  I popped today's sentiment to make sure that is stands out from the background and gave it a little extra with a quick bow of linen twine. 

Check out some close ups below...


Anyone have any ideas on which set to feature next?! Check back next week to see which is the lucky winner! 

Card Details
Size: 4 1/4" x 5 1/2"
Paper: Crumb Cake, Vellum, Basic White, Harvest Meadow DSP
Ink: Evening Evergreen, Bumblebee, Crumb Cake
Stamps: Arrange a Wreath bundle
Tools: Arrange a Wreath bundle, Lovely Labels Pick a Punch
Accessories: Gilded Gems, Linen Twine

Today's project was inspired by the following challenge...


Keep Austin Crafty!
------------------------------------------------------------------------------------------------------------------------

Did you like today's post?!  If so, don't forget to...
  • Leave a comment below! I love to hear your thoughts on the day's project!
  • Want to purchase any of the items used in today's project? Pop on over to my online store using the link on the right! 
  • Follow me on Pinterest.
  • Check out my Etsy Shop.  

Sunday, July 25, 2021

Card: Christmas Beauty

 Hello and Welcome! 

Welcome to today's post! Today sees card 3 of 4 based on the Arrange a Wreath bundle.  As I mentioned last week, it's never to early for our Christmas cards so let's take another look at what this bundle can do! 

And here is today's project...


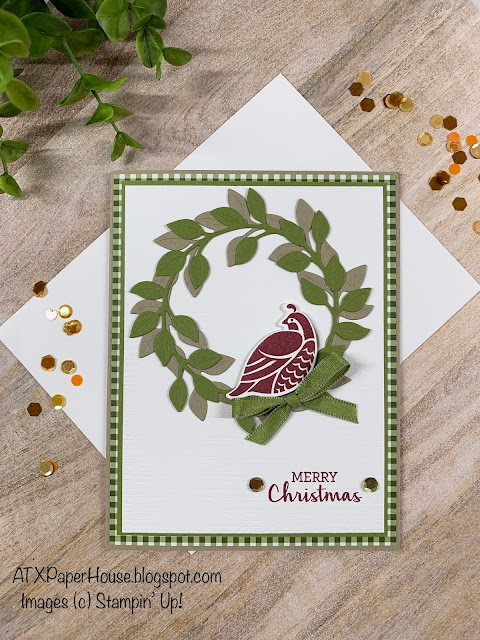
I loved the background of the Heartwarming Hugs DSP on last week's card, so I have featured it again on today's lovely Christmas card.  I love the color combination of Old Olive and Real Read and it just definitely means Christmas! Again, the lovely wreath combination with the "Merry Christmas" sentiment board is a beautiful showstopper.  The wreaths are layered on top of one another; however, I did use our Stampin' Dimensionals to pop the sentiment board.  Add a few red and gold sequins for good measure :)

Check out a close-up and the inside below...


Card Details
Size: 4 1/4" x 5 1/2"
Paper: Crumb Cake, Heartwarming Hugs DSP, Old Olive, Basic White, Real Red
Stamps: Arrange a Wreath
Ink: Crumb Cake, Real Red
Tools: Wreath Builder die-cuts
Accessories: White thread, red and gold sequins


Today's card was inspired by the following challenge: 


Keep Austin Crafty!
------------------------------------------------------------------------------------------------------------------------

Did you like today's post?!  If so, don't forget to...
  • Leave a comment below! I love to hear your thoughts on the day's project!
  • Want to purchase any of the items used in today's project? Pop on over to my online store using the link on the right! 
  • Follow me on Pinterest.
  • Check out my Etsy Shop.  

Sunday, July 18, 2021

Card: A Christmas Wreath

Hello and Welcome! 

Welcome to today's post! It's time to share the second installment in my Arrange a Wreath bundle feature.  I figured it's never too early to start work on this year's Christmas cards and I couldn't wait to use that cute, little partridge! 

And here is today's project...


Isn't that the cutest little bird!? There is so much to love about this card and I love how it came out.  I wanted to go for a little country Christmas look so I love the checkered background as the card base.  A simple layered wreath in Crumb Cake and Old Olive pulls the card together.  I added an Old Olive ribbon and gold sequence for extra bling.  

Check out some close-ups and inside the card below...


Card Details
Size: 4 1/4" x 5 1/2" 
Paper: Crumb Cake, Heartwarming Hugs DSP, Basic White, Old Olive
Ink: Merry Merlot, Old Olive
Stamps: Arrange a Wreath
Tools: Wreath Builder die-cuts, 3D Subtle Embossing folder
Accessories: Old Olive ribbon, sequins


Keep Austin Crafty!
------------------------------------------------------------------------------------------------------------------------

Did you like today's post?!  If so, don't forget to...
  • Leave a comment below! I love to hear your thoughts on the day's project!
  • Want to purchase any of the items used in today's project? Pop on over to my online store using the link on the right! 
  • Follow me on Pinterest.
  • Check out my Etsy Shop.  

Sunday, July 11, 2021

Card: Arrange a Wreath

Hello and Welcome! 

Welcome to today's post! It is time to move on to my next featured stamp set and I'm so excited to share these upcoming projects.  For my next installment, I have chosen to go with the lovely Arrange a Wreath with coordinating die-cuts.  I've started with a simple wreath feature, but can't wait to showcase some great Christmas ideas...nope, it's never to early for Christmas! 

And here is today's project...


Who doesn't love a beautiful wreath to greet your guests as they enter your home?! Well, now you can put that beautiful wreath on a card! These die-cuts were so delicate to work with and the result is simple perfection.  Start with a background of Stampin' Up!'s Wood Textures DSP to give you the barn door look and then layer your colorful cardstock using the wreath die-cuts.  Using a mini glue dot, you can secure the linen twine to give the look that your wreath is hanging.  

Check out some close ups and the card details below...


Card Details
Size:  4 1/4" x 5 1/2"
Cardstock: Early Espresso, Basic White, Mint Macaron, Petal Pink, Crumb Cake
Stamp Set: Arrange a Wreath
Ink: Crumb Cake, Early Espresso, Mint Macaron
Tools: Wreath Builder die-cuts
Accessories: Linen Twine

Today's card was inspired by the following challenge: 


Keep Austin Crafty!
------------------------------------------------------------------------------------------------------------------------

Did you like today's post?!  If so, don't forget to...
  • Leave a comment below! I love to hear your thoughts on the day's project!
  • Want to purchase any of the items used in today's project? Pop on over to my online store using the link on the right! 
  • Follow me on Pinterest.
  • Check out my Etsy Shop.  

Sunday, June 20, 2021

Card: A Touch of Highland Heather

Hello and Welcome! 

Welcome to today's blog! Today's card is the final feature in my tour through the Flowering Cactus stamp set and Designer Series Paper.  This was such a fun set to work with and I love how all these projects turned out.  It was nice to focus on one series for a bit to make sure I was able to create a wide variety of projects all with the same supplies.  

And here is today's card...


I think this may be the first card I have made featuring the Highland Heather shade and I have to say I wasn't quite sure at first about a cactus with purple.  However, I think it adds just the right amount of softness to the card.  The stitched rectangle die-cuts help to add a bit of symmetry as well and paired with the Lovely Labels Pick a Punch the sentiment can really pop.  The mint macaron background has taken a turn through the Big Shot with the 3D Subtle Embossing folder for just a bit extra. 

Don't forget about the inside of your card as well! 


Card Details
Size: 4 1/4 x 5 1/2 
Paper: Highland Heather, Basic White, Mint Macaron, Flowering Cactus DSP
Ink: Mint Macaron
Stamps: Flowering Cactus, Butterfly Gala
Tools: Stitched Rectangle die-cuts, 3D Subtle Embossing Folder
Accessories: White twine

Keep Austin Crafty!
------------------------------------------------------------------------------------------------------------------------

Did you like today's post?!  If so, don't forget to...
  • Leave a comment below! I love to hear your thoughts on the day's project!
  • Want to purchase any of the items used in today's project? Pop on over to my online store using the link on the right! 
  • Follow me on Pinterest.
  • Check out my Etsy Shop.  

Sunday, June 13, 2021

Card: Scrappy Strip Technique

Hello and Welcome! 

Welcome to today's post! We are on card #3 featuring the Flowering Cactus set and I am excited to share today's project.  I've put a few projects together featuring Bruno Bertucci's "scrappy strip" technique, so when I saw lots of Flowering Cactus DSP scraps decorating my she shed...I put them to work.  

And here is today's project...


My favorite color combination lately has been anything with Terracotta Tile.  I love the boldness of the color and I think it can make the sentiment really pop especially using the background of Old Olive and Mint Macaron.  

This card also features another one of my favorite tools - the Banner Punch! I love a good punch tool.  I find that they are super easy to work with and quick and simple way to create beautiful shapes.  The "Banners Pick a Punch" is also quite versatile and a great option if you are looking for a new punch tool.  Check out some more detail pictures below.  


Card Details
Size: 4 1/4" x 5 1/2"
Paper: Old Olive, Basic White, Terracotta Tile, Flowering Cactus DSP
Ink: Terracotta Tile
Stamps: Ornate Thanks
Tools: Banner Punch, Celebration Labels die-cuts
Accessories: Linen Thread

Keep Austin Crafty!
------------------------------------------------------------------------------------------------------------------------

Did you like today's post?!  If so, don't forget to...
  • Leave a comment below! I love to hear your thoughts on the day's project!
  • Want to purchase any of the items used in today's project? Pop on over to my online store using the link on the right! 
  • Follow me on Pinterest.
  • Check out my Etsy Shop.  

Sunday, June 6, 2021

Simple Note Card Cactus Style

 Hello and Welcome! 

Welcome to today's post! I am excited to share today's project as it is the second in my tour through the Flowering Cactus stamp set.  Today's project is a clean and simple set of note cards featuring this cute, little set.  

And here is today's project...


I love the way these simple note cards turned out.  I wanted to keep it simple and let the stamp set shine with just the bottom focus on the cactus.  The Basic White cardstock was run through the Big Shot with the Subtle embossing folder and while you can't see it in much detail through the photo it really adds just a bit of design to the overall card.  The simple linen thread pulls the whole thing together.  


Card Details
Size: 4 1/4" x 5 1/2"
Paper: Terracotta Tile, Flowering Cactus DSP, Basic White
Ink: Old Olive, Terracotta Tile
Tools: Flowering Cactus die-cuts
Accessories: Linen Thread


Keep Austin Crafty!
------------------------------------------------------------------------------------------------------------------------

Did you like today's post?!  If so, don't forget to...
  • Leave a comment below! I love to hear your thoughts on the day's project!
  • Want to purchase any of the items used in today's project? Pop on over to my online store using the link on the right! 
  • Follow me on Pinterest.
  • Check out my Etsy Shop.   


Sunday, May 30, 2021

Welcome Back!

Hello and Welcome!

Welcome back to ATXPaperHouse! I have missed you and I'm so glad you have joined me today.  What a crazy few months it has been and because of the craziness I was forced to take a short break from my crafting.  But I'm excited to say that I am back (I hope!) and trying to make sure that I take time to craft and enjoy some downtime. 

To make sure that I am able to stay on track I have decided to focus my attention on one set.  I thought I would spend some time CASEing the catalog, making a few of the same project and/or making an original design.  For the month of June, I have decided to focus on the Flowering Cactus stamp set, DSP and coordinating die-cuts.  

And here is today's project...


This project is a CASE of the January-June 2021 mini-catalog on page 8.  The coordinating colors of Old Olive and Terracotta Tile really pop and help to make the cactus images stand out.  I needed a birthday card for my card stash so I decided to change the sentiment up.  It's always good to have plenty of "Happy Birthdays" on hand! 

Check out the inside stamping and up-close detail below!


Card Details
Size: 4 1/4" x 5 1/2"
Paper: Terracotta Tile, Old Olive, Basic White, Flowering Cactus DSP
Stamps: Flowering Cactus, Posted For You
Ink: Old Olive, Terracotta Tile, Crumb Cake
Tools: Flowering Cactus die-cuts, Banner Punch
Accessories: Calypso Coral Twine

Marley's Corner!
------------------------------------------------------------------------------------------------------------------------

Thanks for stopping by Marley's Corner! Marley was so excited to share her first card back as well and decided to feature a "flip-flap-flop" (her term) card with unicorns and hearts! 


Keep Austin Crafty!
------------------------------------------------------------------------------------------------------------------------

Did you like today's post?!  If so, don't forget to...
  • Leave a comment below! I love to hear your thoughts on the day's project!
  • Want to purchase any of the items used in today's project? Pop on over to my online store using the link on the right! 
  • Follow me on Pinterest.
  • Check out my Etsy Shop.   

Sunday, February 14, 2021

Card: Happy Valentine's Day

Hello and Welcome!

Welcome to today's post! Happy Valentine's Day to all my lovely readers! I hope you are having a nice and cozy day celebrating with your loved ones.  We are having some incredibly cold weather here in Austin this weekend, so I am thankful to be snuggled warm with my family.  It also leaves plenty of time to craft...no errands, no place to be...just crafting away! 

Of course I had to share a Valentine's project in honor of today.  So I pulled out some of my retired DSP and got to work.  And here is today's project...


Today's project features the retired From My Heart DSP and I'm so thrilled to be using what's left of this gorgeous paper.  It is so fun to work with because I love those bright and cheery reds and pinks.  Paired with some die-cut hearts and a lovely stitched die-cut for the sentiment this card was simple and quick to put together.  

For the inside of the card, I paired the Be Mine Stitched die-cuts with the beautiful Happy Valentine's Day sentiment.  I added a little bit of white twine around the fold of the card and tied it off with a nice little bow. 


Card Details
Size: 4 1/4" x 5 1/2"
Paper: Whisper White, Real Red, Vellum, From My Heart DSP
Stamps: Banner Year, Meant To Be
Ink: Real Red
Tools: Be Mine Stitched die-cuts, Potted Succulent die-cuts, Subtle 3D Embossing folder
Accessories: White Linen Twine, From My Heart embellishments

Today's project was inspired by the following sketch challenge: 

TGIF Challenges

#tgifc303


Marley's Corner!
------------------------------------------------------------------------------------------------------------------------

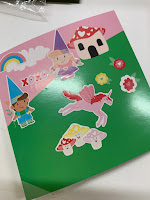
My unicorn and fairy themed Valentine's card from my little Valentine! 


Keep Austin Crafty!
------------------------------------------------------------------------------------------------------------------------

Did you like today's post?!  If so, don't forget to...
  • Leave a comment below! I love to hear your thoughts on the day's project!
  • Want to purchase any of the items used in today's project? Pop on over to my online store using the link on the right! 
  • Follow me on Pinterest.
  • Check out my Etsy Shop.   
Sunday, February 7, 2021

It's Football Day!


Happy SuperBowl Sunday! 

Check back next week for an all new ATXPaperHouse creation! 


Sunday, January 31, 2021

Card: Birthday Blooms

Hello and Welcome! 

Welcome to today's post! I hope everyone is enjoying a wonderful and relaxing weekend.  We are gearing up for a busy week with the start of our first major home renovation...new floors! I am very excited and my dream of turning my home into my very own Fixer Upper (I love all things Joanna Gaines!) is coming to fruition.  Wish us luck! 

In between moving all of our furniture to the garage, I took some time to create this week's card featuring the beautiful Paper Blooms DSP.  

And here is today's project...


This paper is so fun and versatile.  Today I needed a birthday card and I went with this lovely color combination of Gray Granite, Powder Pink and Nigh of Navy.  This is such a perfect color scheme for this paper and I think the subtle touches of pink bring out a softness to the paper.  It's a pretty simple card, but sometimes the simpler the better.  I did decide to "pop" a few of my punched flowers to add a little extra dimension and of course those beautiful From My Heart embellishments give it just the right touch.    

There were lots of different products used for today's card and I love when I can get my use out of so many different sets.  Don't forget a little love for the envelope as well to make sure you're project is complete.  Check out some close ups below!


Card Details
Size: 4 1/4" x 5 1/2"
Paper: Night of Navy, Whisper White, Paper Blooms DSP
Ink: Gray Granite, Night of Navy, Powder Pink
Stamps: Treasured Medallions, Thoughtful Blooms
Tools: Stitched Rectangle die-cuts, small bloom punch, 
Accessories: From My Heart embellishments

Today's project was inspired by the following challenges: 


Marley's Corner!
------------------------------------------------------------------------------------------------------------------------

Check back next week for another addition to Marley's Corner! 


Keep Austin Crafty!
------------------------------------------------------------------------------------------------------------------------

Did you like today's post?!  If so, don't forget to...
  • Leave a comment below! I love to hear your thoughts on the day's project!
  • Want to purchase any of the items used in today's project? Pop on over to my online store using the link on the right! 
  • Follow me on Pinterest.
  • Check out my Etsy Shop.   

Sunday, January 24, 2021

Card: Stitched Valentine's Day

Hello and Welcome! 

Welcome to today's post! Valentine's Day is quickly approaching and I was excited this weekend to pull out my reds and pinks for today's card! I started with a little inspiration from the Stampin' Pretty Sketchbook.  When I saw sketch #19, I couldn't wait to try it out.  I'm loving my new Stitched Shapes die-cuts, so I was thrilled to be able to use these die-cuts in such an innovative way.  You can check out the sketch and the Stampin' Pretty inspiration here.  

And here is today's project...


Isn't this the neatest way to use these stitched squares?! I featured the retired From My Heart DSP for this card and I love the finished product! I was such a fan of this DSP and it was a huge hit when featured during last year's Valentine's Day card making event at my local library.   I still have just a few scraps left and I love when I can put those scraps to use.  I love that I was able to use a nice selection of Valentine's items from the retired DSP to the current Heartfelt stamp set.  

A "Happy Valentine's Day" sentiment surrounded by sweet, little hearts finishes up the project.  Don't forget to add those embellishments for some extra love! 

 
Card Details
Size: 4 1/4" x 5 1/2"
Paper: Flirty Flamingo, Basic White, Real Red, From My Heart DSP
Ink: Real Red
Stamps: Meant to Be, Heartfelt 
Tools: Heart Punch, Be Mine Stitched die-cuts
Accessories: Real Red Satin Ribbon, From My Heart embellishments

Marley's Corner!
------------------------------------------------------------------------------------------------------------------------

Check back next week for another addition to Marley's Corner! 


Keep Austin Crafty!
------------------------------------------------------------------------------------------------------------------------

Did you like today's post?!  If so, don't forget to...
  • Leave a comment below! I love to hear your thoughts on the day's project!
  • Follow me on Pinterest.
  • Check out my Etsy Shop.