Showing posts with label A Big Thank You. Show all posts

Tuesday, May 7, 2019

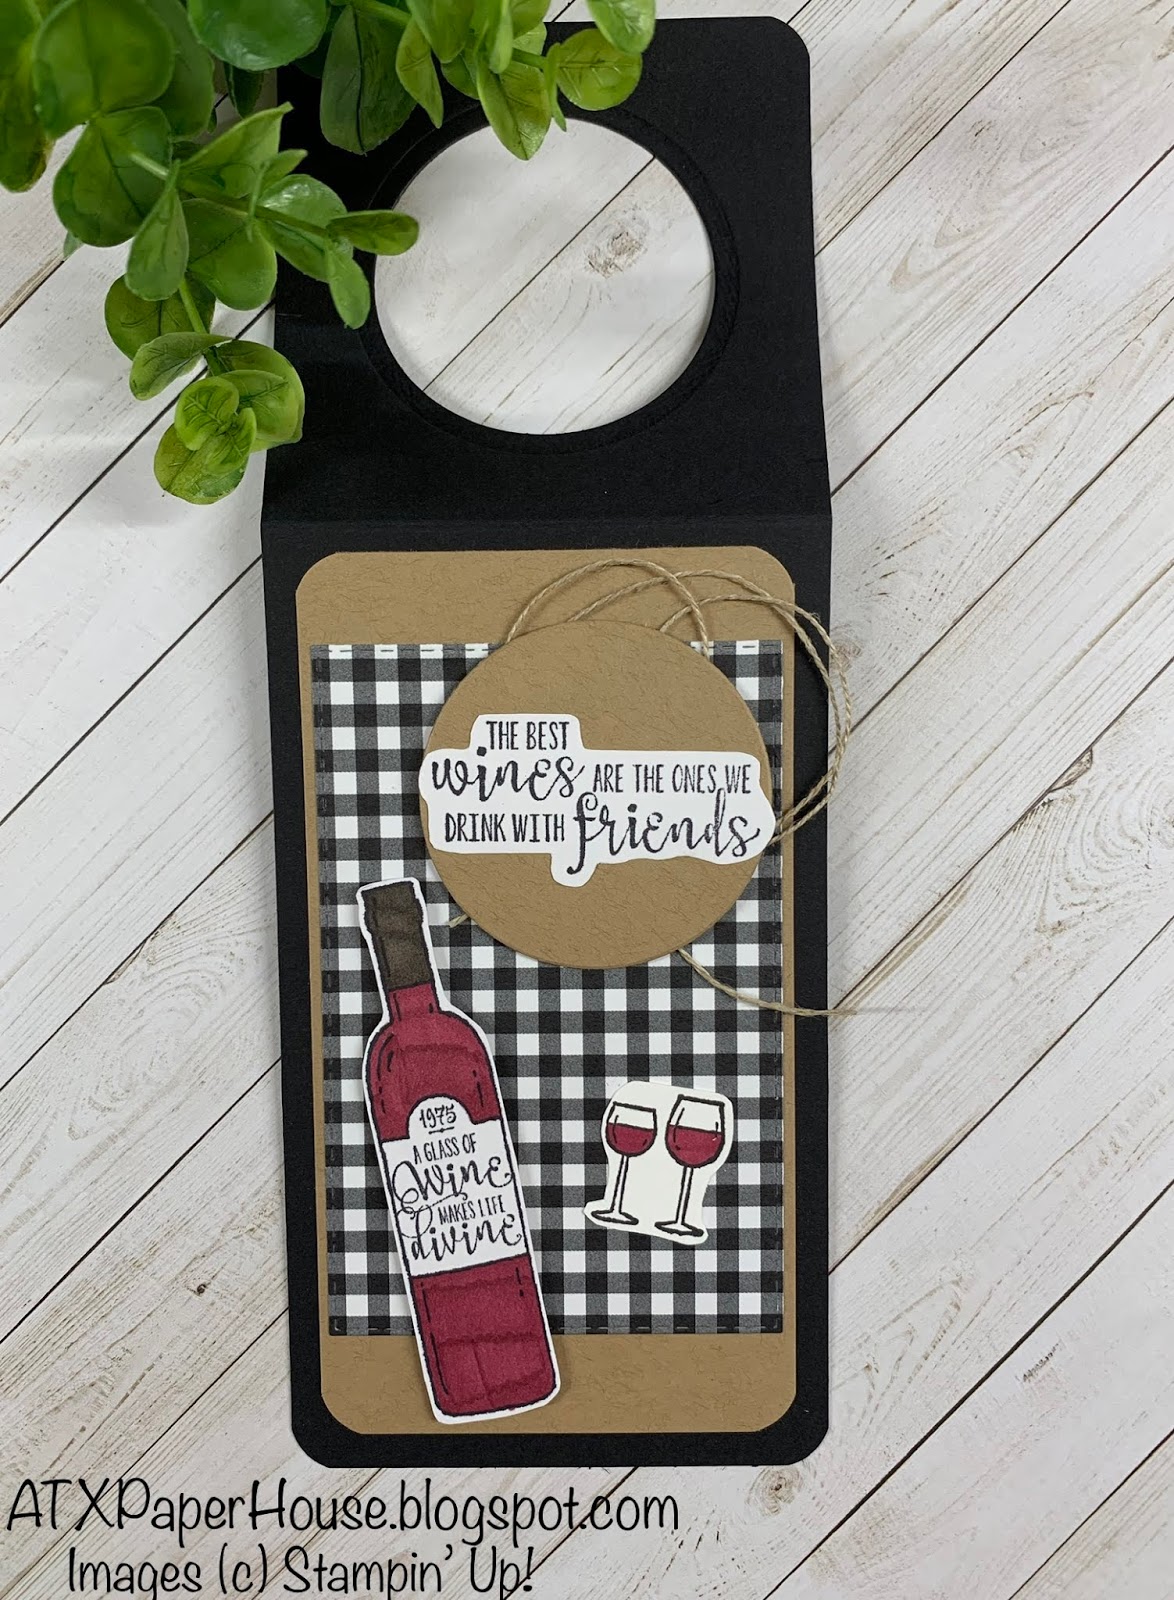
Wine Tags: Friendly Assortment

Hello and Welcome!

A happy Tuesday to all of you out there! Long time, no see...wait, no blog.  Thankfully, it is not because I haven't been creating, but because I received my first custom order and have been working hard to complete it.  I received an order for custom wine tags.  I hope that I have delivered some beautiful tags that bring a smile to someone's face...not just because they will be receiving a bottle of wine, but because the bottle will be decorated so beautifully!

I tried to create a variety of styles using different colors, inks and stamp sets.  In addition to what I would consider a "traditional" wine theme, I wanted to feature friendship as a part of the project.  Friendship is the focus of this week's challenge at The Paper Players and I thought this was the perfect project to incorporate with this challenge.  As the stamp set says, "The best wines are the ones we drink with friends".  Couldn't be more true! So grab your favorite glass and have a look...

Here is today's project...


Colorful and unique.  Just the right touch of sophistication to a bottle of wine.  I had a lot of fun putting these together and really enjoyed papercrafting beyond just the traditional card.  I think it helps with one's creativity to take a step out of your comfort zone and create something you don't usually do.  Of course, I had so much fun these just might become a regular project! 

So here are some details...

Size: All tags measured 3 1/8" x 8 1/2", card stock is scored at 3 1/8"
Tag Circle: 2" circle die cut
Paper: Whisper White, Basic Black, Crumb Cake, Very Vanilla, Mint Macaron, Old Olive, Rich Razzleberry, Share What You Love DSP, Botanical Butterfly DSP
Ink: Tuxedo Black, Fresh Fig
Stamp Set: Half Full, A Big Thank You, Home to Roost, Daisy Delight
Tools: Well Written Die Cuts

And here are some close ups of what I think are my favorites :)


Some of today's tags were inspired by the following challenge:
Keep Austin Crafty!
------------------------------------------------------------------------------------------------------------------------

Did you like today's post?!  If so, don't forget to...

Thursday, April 25, 2019

Card: You are the Best!

Hello and Welcome!

Welcome to today's post.  So if you read last week's posts, you know how much I love Fresh Fig.  Well, here we go again with Fresh Fig...it's just too good! Today I paired it with the lovely Very Vanilla cardstock and I think I love it even more...is that possible?!

I also tried a new technique called "Paper Piecing" (thank you Paper Players for the challenge).  I'm not sure I picked the best stamp set to work with on this technique, but the technique is definitely one I will try again.  It was fun to use the Designer Series Paper in this way and give the card a little extra texture.  

And here is today's card...


The Fresh Fig against the Very Vanilla really makes the color pop! Add a little velvet ribbon and you have a lovely combination of colors.  So let's get to the details...

The paper piecing technique is used on the side flowers.  I went back and forth on what part of the centerpiece to "pop" with dimensionals and I decided on the sentiment portion itself.  I started by stamping the large flowers (Sunshine Sayings stamp set) on a piece of Very Vanilla cardstock.  I then stamped the same flower image on a piece of Share What You Love DSP.  I fussy cut the stamped DSP image and adhered to the Very Vanilla image using the Fine Tip Glue Pen.  I fussy cut the Very Vanilla image and adhered to the card base using the Fine Tip Glue Pen.  I then stamped additional flower images from the A Big Thank You stamp set to the card base for added detail.  The sentiment and border is stamped in Fresh Fig (obviously!) and adhered to the card base using dimensionals.  

I pulled out my Envelope Punch Board and handmade the matching envelope and included the Share What You Love as the envelope liner.  Finishes the card nicely! 

Card Details
Card Size: 4 1/4" x 5 1/2"
Paper: Very Vanilla, Share What You Love DSP
Ink: Fresh Fig
Stamp Set: A Big Thank You, Sunshine Sayings
Tools: Rectangle Stitched Die Cuts
Accessories: Fresh Fig velvet ribbon, Share What You Love adhesive pearls


Today's card was inspired by the following challenges: 


Keep Austin Crafty!
------------------------------------------------------------------------------------------------------------------------

Did you like today's post?!  If so, don't forget to...
  • Leave a comment below! I love to hear your thoughts on the day's project!
  • Check at the ATXPaperHouse Card of the Month Club!
  • Follow me on Pinterest.
  • Check out my Etsy Shop.  NEW cards added this week! 
--------------------------------------------------------------------------------------------------------------------------

Clearance Rack

Stampin' Up! Clearance Rack REFRESH! Don't forget to check out the Clearance Rack for the latest deals and steals! These products sell out quickly and are only available while supplies last! Search for Angela Slutz, Texas and click "SHOP NOW"! Happy Shopping!

Thursday, April 11, 2019

Card: Black and White Checks

Hello and Welcome!

Welcome to today's post.  I'm back today to share a card that was inspired by a few different challenges this week.  I was happy to pull out this black and white checkered paper because it was so fun to work with! The paper was clean and simple and served as the perfect background for today's sentiment.  

Cute little story on the selection of today's sentiment...My daughter and I recently cleaned up our garden for Spring.  We added our new hummingbird food to the feeder, which sits right next to our kitchen window.  Just yesterday, we got our first hummingbird of the season and her response "Hello Friend!"  So when I was putting together today's card, I had her cute little bird friend in mind.  

And here is today's card...

Aren't the details of the embellishments wonderful?!?  The white, flowered vines and bird die cut are part of the Well Said Cling Bundle Set.  The set was a must have for me because I loved the detail of the die cuts.  And those pearls just add the perfect touch to the end of the vines.  

And check out the envelope! Took Tuesday's post advice and inked up the front of the envelope for some added design.  

Card Details
Size:  5 1/2" x 4 1/4"
Paper: Basic Black, Botanical Butterfly DSP, Whisper White
Ink: Versamark, Fresh Fig, Crumb Cake
Stamp Set: A Big Thank You, Make a Difference
Tools: Well Said Die Cuts, Rectangle Stitched Die Cuts, Circle Punch
Accessories: Pearl embellishments


Today's card was inspired by the following challenges:

SUO Challenges -


Keep Austin Crafty!
-------------------------------------------------------------------------------------------------------------------

Did you like today's post?!  If so, don't forget to...

Saturday, March 16, 2019

Card: Luck of the Irish!

Hello and Welcome!

It is St. Patrick’s Day weekend and I hope everyone is feeling the “Luck of the Irish”! We love to wear our green and have a little fun celebrating the day! So I decided to make my daughter’s card for her little goodie basket this year and I wanted to share the finished product with you today!

And here is today’s card...


I love all the shamrocks and the sentiment! My little one even picked out the paper and I love when she gives her input on my cards! I hope she loves it! 

Step-by-step instructions

1.  Start with a your choice of green colored card stock cut to 4" x 4 1/2" as the card base.  
2.  Using the smallest heart shape stamp from the "A Big Thank You" stamp set, create a mini shamrock scene on the card base using Garden Green Ink.  
3.  Trim a piece of vellum to 3 3/4" x 4 1/4" and adhere to the card base using snail adhesive. 
4.  Crop a piece of Whisper White card stock using the Rectangle Stitched Die Framelits.  
5.  Using the Stamparatus and the "Make a Difference" stamp set, stamp the sentiment "Luck of the Irish" in Garden Green ink.  
6.  Crop a piece of the green card stock and a fun piece of decorative card stock stock using a basic circle die cut.  
7.  On the cropped green piece, stamp the heart shape from the "Work of Art" stamp set in Garden Green ink into a shamrock shape.  

I will leave you with a close up of the sentiment.  It is sweet and simple.  I love the "Make a Difference" set because if you are willing to take the time to measure everything out then you will always have the perfect sentiment.  


This card was inspired not just by the holiday, but by the challenges below...


Keep Austin Crafty!

Thursday, February 28, 2019

Card: Can't get enough of those Butterflies

Hello and Welcome!

Today's card was inspired by a few of this week's challenges.  It has been a cold and dreary day here in Austin, so it was the perfect day to snuggle up in my "she shed" and make some cards.  Even my little one is feeling the cold because as I write this she is quietly sitting beside me making her own card.  It's a good day for crafting!

I had to stick with the Botanical Butterfly DSP as a the centerpiece of this card.  The paper is just beautiful and I love using it as the focal point. 

And here is today's card...


Step-by-step instructions

1.)  Start with a piece of Grapefruit Grove cut to 4 1/4" x 5 1/2" as the card base. 
2.)  Trim a piece of Botanical Butterfly DSP to 4" x 5 1/4" and adhere to the card base using snail adhesive. 
3.)  Stamp the sentiment and design from "A Big Thank You" stamp set in Tuxedo Black ink on Whisper White card stock. 
4.)  Crop the sentiment, a piece of Grapefruit Grove card stock and a piece of Basic Black card stock using the Rectangle Stitched Framelits.  Adhere the Grapefruit Grove card stock with snail adhesive.  Add a piece of linen thread underneath the Basic Black card stock before adhering with mini Stampin' Dimensionals.  Adhere the sentiment crop using Stampin' Dimensionals.


Today's card was inspired by the following challenges:


Keep Austin Crafty!

Tuesday, February 12, 2019

CASE it UP Tuesday: Flowers for a Friend

Hello and Welcome!

Welcome to the first edition of CASE it UP Tuesday! Ever see a beautiful card on Pinterest or in a catalog and think "I wish I could make that?!"?  Well, I'm here to tell you that you can! Even the best creative card maker could use a little inspiration sometime, so I have started this weekly post dedicated to CASEing (Copy and Share Everything)!  You can learn to make a card exactly as you see it, use only certain elements (i.e. embellishments and ribbon) or take the layout as a starting point.  What's important is that you take time to create and make something beautiful!  

Today I have to give credit to the wonderful Mary Fish at Stampin' Pretty.  I have taken her "Let's Giggle with Happiness Blooms" post and applied the A Big Thank You stamp set and Share What You Love DSP.  

Here is today's card...


Step-by-step instructions

1.)  Start with a piece of Old Olive card stock cut to 4 1/4" x 5 1/2" as the card base. 
2.)  Adhere a piece of Whisper White card stock cut to 4" x 5 1/4" to the card base with Snail Adhesive. 
3.)  Adhere three strips of Share What You Love DSP (1" x 4") to a piece of Old Olive card stock cut to 3 1/2" x 4 1/4" with Snail Adhesive. 
4.)  Stamp the sentiment from A Big Thank You stamp set in Fresh Fig ink on Whisper White card stock. 
5.)  Use the Big Shot and 2nd smallest rectangle (Old Olive) and smallest rectangle (Whisper White sentiment) dies from Rectangle Stitched Framelits Dies. Adhere together with Snail Adhesive. Adhere to the card with mini Stampin' Dimensionals. 


6.)  I added some additional embellishments with a twist of copper twine underneath the sentiment section and a few bronze colored sequence.  

Thanks for stopping by today for this quick and easy CASE card!

Keep Austin Crafty! 

Saturday, February 9, 2019

Fresh Flowers

Hello and Welcome!

A happy Saturday morning to all of my fellow crafters!  Today I am sharing a card that was made for my dear old dad as a HUGE Thank You for the work he did to help me create the crafting space that I so lovingly call my "she shed".  As you may know, we recently completed the project to turn my extra closet into a craft space and I could not be happier with how it turned out.  Now I have a special place for all my crafting goodies and a quiet space to create cards like the one I am sharing today.  

Here is today's card...

   
Don't you just love all those beautiful flowers going up the edge of the card?! I tried to bring some real garden aspects into the card as well with a dark background and twine as the embellishment.

Step-by-step instructions

1.)  Start with a piece of Whisper White card stock cut to 4 1/4" x 5 1/2" as the card base.  
2.)  Using the second and third largest die cuts in the Rectangle Stitched Framelits Dies series cut one piece in Soft Suede and one piece in Whisper White card stock.  
3.)  Using the smallest die cut of the Rectangle Stitched Framelits Dies series cut one piece of Whisper White card stock and stamp the sentiment in Fresh Fig ink.  
4.)  Stamp the floral background using the A Big Thank You stamp set in Fresh Fig, Powder Pink and Garden Green ink onto the die cut white card stock.

  
5.)  Wrap with Linen Thread and secure the sentiment and added button embellishment with the Fine Tip Glue Pen.  


6.)  Adhere the layer of Soft Suede card stock with Snail Adhesive and the stamped Whisper White layer with Stampin' Dimensionals.  
7.)  Stamp the corner of the envelope with the matching floral background for added color.  

Reminds me of a lovely spring garden! 

I'll be entering this card into the following challenges: 


Global Design Project #175


Keep Austin Crafty!