Showing posts with label Botanical Butterfly DSP. Show all posts

Tuesday, May 7, 2019

Wine Tags: Friendly Assortment

Hello and Welcome!

A happy Tuesday to all of you out there! Long time, no see...wait, no blog.  Thankfully, it is not because I haven't been creating, but because I received my first custom order and have been working hard to complete it.  I received an order for custom wine tags.  I hope that I have delivered some beautiful tags that bring a smile to someone's face...not just because they will be receiving a bottle of wine, but because the bottle will be decorated so beautifully!

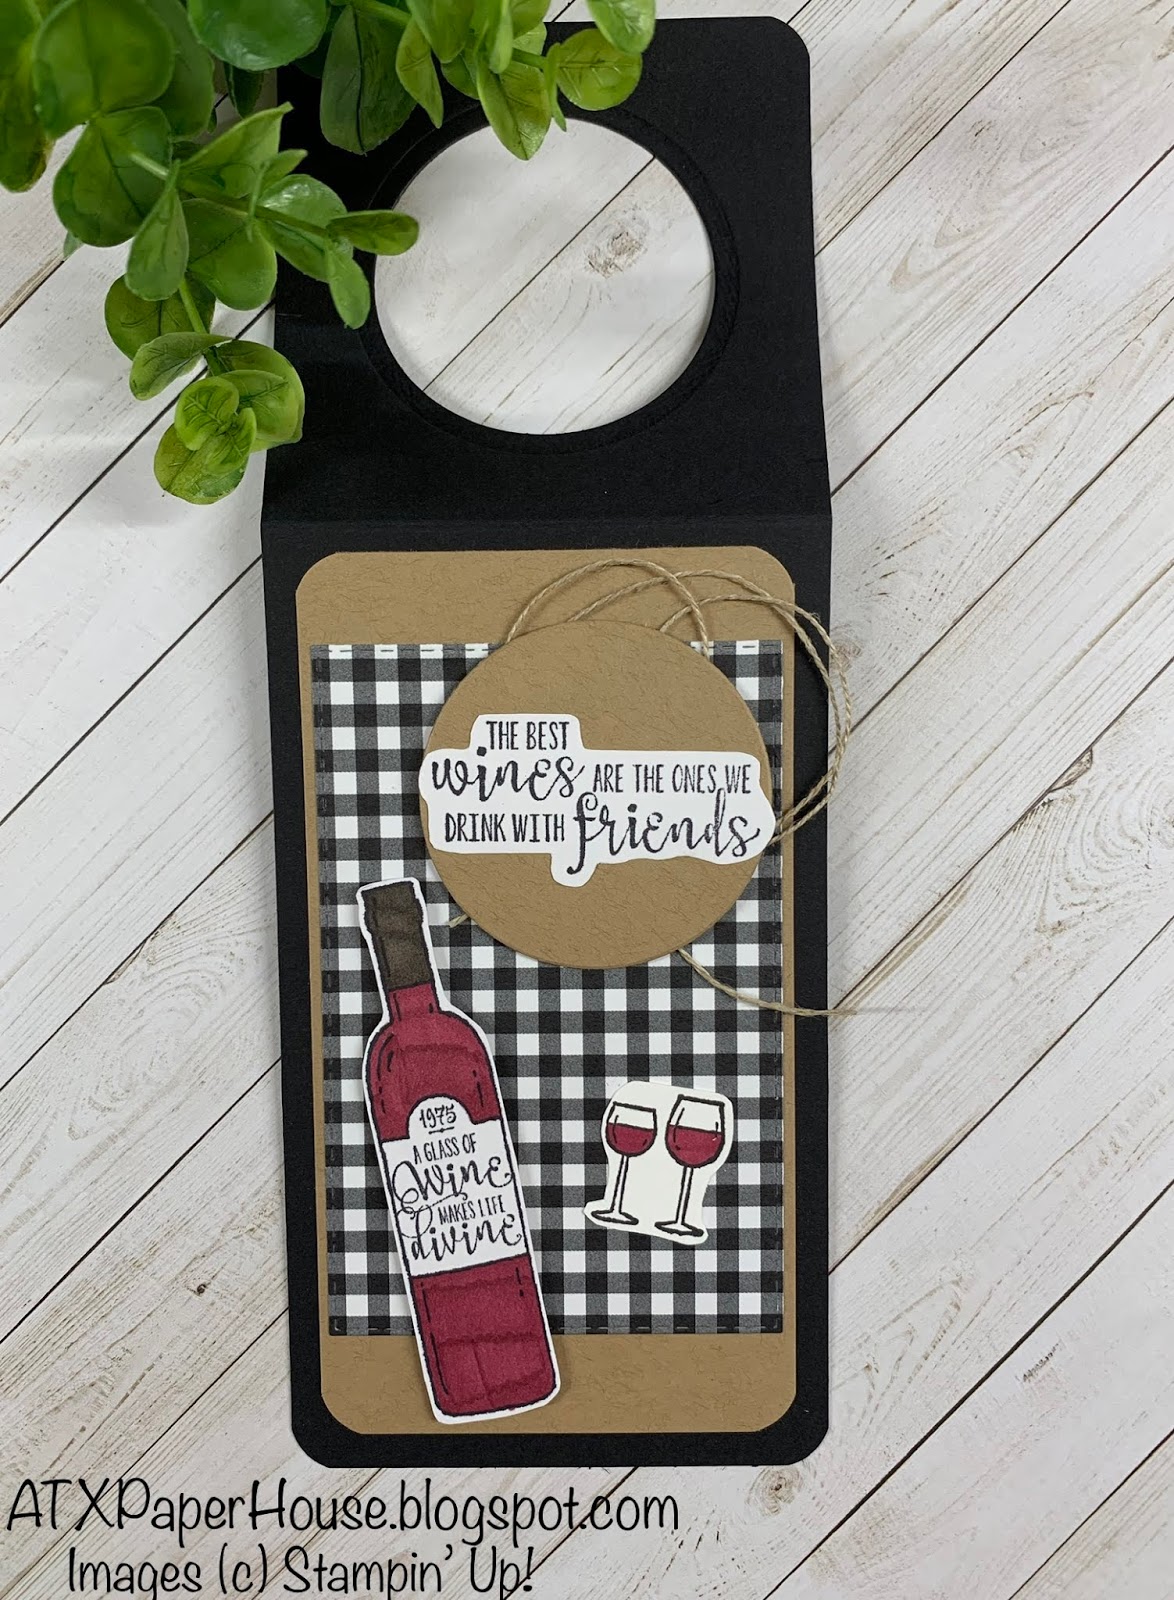
I tried to create a variety of styles using different colors, inks and stamp sets.  In addition to what I would consider a "traditional" wine theme, I wanted to feature friendship as a part of the project.  Friendship is the focus of this week's challenge at The Paper Players and I thought this was the perfect project to incorporate with this challenge.  As the stamp set says, "The best wines are the ones we drink with friends".  Couldn't be more true! So grab your favorite glass and have a look...

Here is today's project...


Colorful and unique.  Just the right touch of sophistication to a bottle of wine.  I had a lot of fun putting these together and really enjoyed papercrafting beyond just the traditional card.  I think it helps with one's creativity to take a step out of your comfort zone and create something you don't usually do.  Of course, I had so much fun these just might become a regular project! 

So here are some details...

Size: All tags measured 3 1/8" x 8 1/2", card stock is scored at 3 1/8"
Tag Circle: 2" circle die cut
Paper: Whisper White, Basic Black, Crumb Cake, Very Vanilla, Mint Macaron, Old Olive, Rich Razzleberry, Share What You Love DSP, Botanical Butterfly DSP
Ink: Tuxedo Black, Fresh Fig
Stamp Set: Half Full, A Big Thank You, Home to Roost, Daisy Delight
Tools: Well Written Die Cuts

And here are some close ups of what I think are my favorites :)


Some of today's tags were inspired by the following challenge:
Keep Austin Crafty!
------------------------------------------------------------------------------------------------------------------------

Did you like today's post?!  If so, don't forget to...

Thursday, April 11, 2019

Card: Black and White Checks

Hello and Welcome!

Welcome to today's post.  I'm back today to share a card that was inspired by a few different challenges this week.  I was happy to pull out this black and white checkered paper because it was so fun to work with! The paper was clean and simple and served as the perfect background for today's sentiment.  

Cute little story on the selection of today's sentiment...My daughter and I recently cleaned up our garden for Spring.  We added our new hummingbird food to the feeder, which sits right next to our kitchen window.  Just yesterday, we got our first hummingbird of the season and her response "Hello Friend!"  So when I was putting together today's card, I had her cute little bird friend in mind.  

And here is today's card...

Aren't the details of the embellishments wonderful?!?  The white, flowered vines and bird die cut are part of the Well Said Cling Bundle Set.  The set was a must have for me because I loved the detail of the die cuts.  And those pearls just add the perfect touch to the end of the vines.  

And check out the envelope! Took Tuesday's post advice and inked up the front of the envelope for some added design.  

Card Details
Size:  5 1/2" x 4 1/4"
Paper: Basic Black, Botanical Butterfly DSP, Whisper White
Ink: Versamark, Fresh Fig, Crumb Cake
Stamp Set: A Big Thank You, Make a Difference
Tools: Well Said Die Cuts, Rectangle Stitched Die Cuts, Circle Punch
Accessories: Pearl embellishments


Today's card was inspired by the following challenges:

SUO Challenges -


Keep Austin Crafty!
-------------------------------------------------------------------------------------------------------------------

Did you like today's post?!  If so, don't forget to...

Tuesday, April 9, 2019

Don't forget about the envelope!

Hello and Welcome!

A happy Tuesday to all of you out there! I am excited to share today's post as it focuses on a part of the card that I think gets forgotten sometimes or at least I forget that there's so much more you can do with it...and that's the envelope!

I always have a set of Stampin' Up! Whisper White medium envelopes on hand for my cards.  I tend to stick to the 5 1/2" x 4 1/4" standard size card, so they are just good to have in my stash.  However, I have been attempting to branch out on my card sizes (in particular the square cards), so I recently invested in the Stampin' Up! Envelope Punch Board (product #133774).  And boy does it not disappoint!

I am still getting use to working with this little tool, but I thought I would share with you one of my first projects.  Now the possibilities are really endless with this tool, so keep that in mind. Last week, I shared one my new square card designs (you can see that card here).  The card size was 3.5" x 3.5" and I decided to work with the Envelope Punch Board to design a custom envelope. 


With the punch board, you can create up to 66 different sizes of envelope.  Yes, you read right...66 sizes.  Today, I created a simple white envelope for a 3.5" x 3.5" square card.  Instructions and paper dimensions come with the tool, so it is a very simple process to follow.  


Since this was one of my first projects, I decided to keep it pretty simple with the Whisper White card stock.  However, I didn't want to "forget" about the envelope, so I created the inside liner using the matching DSP from the card.  So even though my envelope may be a standard white, there is that pop of color when you open it up! And that color continues on with the card.

The envelopes are secured with a few simple lines of tear and tape adhesive.  Along that small line of white next to the DSP liner, I added another line of tear and tape; however, with this line the paper backing is left on until the card is ready to send.


I hope today's post reminds you that the beauty of your card doesn't have to end with your card! Jazz up your envelope by creating a custom one, adding a custom liner or even stamping a small portion of your design on the envelope.  How do you decorate your envelopes?!

Keep Austin Crafty!

-----------------------------------------------------------------------------------------------------------------

Did you like today's post?!  If so, don't forget to...

Thursday, April 4, 2019

Card: Butterflies with a Copper Twist


Hello and Welcome! 

Holy cow! What a day! Pardon me while I take a breath because it has been one of those busy mom days!  Between school drop off/pick up, errands, house cleaning, dog walking and an afternoon trip to the park it is no surprise that today's post is going up at 9pm.  It was a beautiful day here in Austin (rather warm to be honest), but that warmth was welcomed with open arms and I think it was the sunshine and clear, blue skies that kept me going today.  Whew...ok I'm done...on to the crafting...

And here is today's card...


Today's card features once again that beautiful Botanical Butterfly DSP.  I framed the DSP with a light brown card stock and added just a few embellishments.  I did not want to take away from those beautiful butterflies.  

I stamped the sentiment in Crumb Cake and hand-trimmed the ends to a point.  A bit of copper twine is wrapped underneath the sentiment to tie in the tiny copper sequins.  Hopefully, you can see those details a little clearer in the pictures below.  

I don't know what it is about square cards, but I am loving them lately! For some reason, they seem to be just the perfect size and they look so darn cute in their little matching envelopes.  Did someone say matching envelopes?? Envelope Punch Board to the rescue!! That's right, these little cuties have matching envelopes which I will feature in an upcoming post...check back soon ya'll! 

Card Details

Card Size: 3.5" x 3.5"
Paper: Basic Black, Kraft (non-Stampin' Up!), Botanical Butterfly DSP, Whisper White
Ink: Crumb Cake
Stamp Set: Home to Roost
Tools: Sizzix Square Framelits (non-Stampin' Up!)
Accessories: Copper twine and metallic sequins 


Today's card was inspired by the following challenge:

Freshly Made Sketches #382


Keep Austin Crafty!
----------------------------------------------------------------------------------------------------------------

Did you like today's post?!  If so, don't forget to...
  • Leave a comment below! I love to hear your thoughts on the day's project! 
  • Follow me on Pinterest.
  • Check out my Etsy Shop.

Thursday, March 28, 2019

Card: Workin' with Stampin' Blends

Hello and Welcome! 

I am very excited to share today's card because I was finally able to play with a pair of Stampin' Blends...and I am hooked! Of course I am! If you've used them before, then you probably know that they are extremely fun and easy to work with and you get a wonderful "blend" of colors that can really add a little something extra to your card.  Plus, I found it extremely therapeutic to sit in my craft area and color this beautiful butterfly paper.  Some quiet crafting time sure does set the mind at ease.  

And here is today's card...


I wanted to keep the focus of today's card on the paper because who doesn't love those butterflies!?  I have been holding on to this particular page because I couldn't decide whether to color the butterflies or just showcase them on a black and white card.  Then the Stampin' Blends arrived and I had my answer! 

This is the second card that I have made that features the fun cut-out design on the front of the card.  You can see the previous card at my post here.  The previous card also features the "Work of Art" stamp set with a black and white card base.  

Today I got into my scrap pile as well and I love when I get to bring old pieces back to life.  The vellum leaves and pink twine are left over from the August 2018 Paper Pumpkin kit.  I don't know how many times my "box o' scraps" has come to the rescue!

Card Details

Card Size:  4 1/4" x 5 1/2" 
Paper: Basic Black, Whisper White, Botanical Butterfly DSP
Ink: Tuxedo Black, Powder Pink
Stamp Set: Work of Art
Stampin' Blends: Flirty Flamingo, Granny Apple Green
Tools: Rectangle Stitched Die Framelits, Circle Punch

Today's card was inspired by the following challenges: 

#SUOC219


Keep Austin Crafty!

Tuesday, March 26, 2019

Card: Dots for Days

Hello and Welcome! 

A happy Tuesday to all! Today's card features the beautiful Botanical Butterfly DSP from Stampin' Up! I choose to use the dotted side of the paper to create a fun and stylish card in pinks and blacks.  

And here is today's card: 


This card is just fun to me and brings a smile to my face.  The pop of pink against the black and white is perfect and I have to say one of my favorite color combinations.  So much so that I chose it as my wedding colors going on nine years ago...still just simple and classic.  

The stamp set Work of Art is an oldie, but a goodie.  The pink dots are inked with Sweet Sugarplum once and then stamped on the paper three times before going back for more ink.  It gives a nice contrast of color between dark and light.

Card Details

Card Size: 4 1/4" x 5 1/2" 
Paper: Basic Black, Whisper White, Botanical Butterfly DSP
Ink: Sweet Sugarplum, Tuxedo Black
Stamp Set: Work of Art
Accessories: Rectangle Stitched Die Framelits, Sprig Punch, ribbon of your choice for extra flair 


Today's layout was inspired by the following challenge: 

#festivefridaychallenge, #FF0030, Stampin Up, Handmade, Dots
First time playing along with this challenge! 

Keep Austin Crafty!

Saturday, March 9, 2019

Spotlight Saturday: Botanical Butterfly DSP

Hello and Welcome!

I hope everyone's weekend is off to a great start! We had some beautiful weather here in Austin today and we were so excited to be able to go out and enjoy it.  We hit up the neighborhood block party and enjoyed some delicious BBQ followed by yummy ice cream...a good time was had by all!

It was nice to be back in town as the little one and I escaped the last of the winter weather (hopefully) with a trip up to the grandparents house! A few days with Grandma and Grandpa can always make things better when it's 20 degrees outside...no we do not do well in the cold!

Anyways, I'm back to blogging and card making after a brief "vaca" and excited to share another completed gift set.  I loved the Botanical Butterfly DSP "Thanks" card that I posted a few days ago, so I decided to make a few more to really highlight that beautiful paper. 

So here are today's cards...


Isn't that paper just beautiful!? You can check out the dimensions and card details at the original post.  

Don't these cards say "SPRING IS HERE!" 

----------------------------------------------------------------------------------------------------------------------

And don't forget the wonderful deals for Sale-A-Bration are still going on until March 31st! 
Check out the brochures below!
And don't hesitate to email me with questions or help ordering! 

20190215_SAB19-2_en-US    20190103_SAB19-1_en-US

Keep Austin Crafty!

Thursday, February 28, 2019

Card: Can't get enough of those Butterflies

Hello and Welcome!

Today's card was inspired by a few of this week's challenges.  It has been a cold and dreary day here in Austin, so it was the perfect day to snuggle up in my "she shed" and make some cards.  Even my little one is feeling the cold because as I write this she is quietly sitting beside me making her own card.  It's a good day for crafting!

I had to stick with the Botanical Butterfly DSP as a the centerpiece of this card.  The paper is just beautiful and I love using it as the focal point. 

And here is today's card...


Step-by-step instructions

1.)  Start with a piece of Grapefruit Grove cut to 4 1/4" x 5 1/2" as the card base. 
2.)  Trim a piece of Botanical Butterfly DSP to 4" x 5 1/4" and adhere to the card base using snail adhesive. 
3.)  Stamp the sentiment and design from "A Big Thank You" stamp set in Tuxedo Black ink on Whisper White card stock. 
4.)  Crop the sentiment, a piece of Grapefruit Grove card stock and a piece of Basic Black card stock using the Rectangle Stitched Framelits.  Adhere the Grapefruit Grove card stock with snail adhesive.  Add a piece of linen thread underneath the Basic Black card stock before adhering with mini Stampin' Dimensionals.  Adhere the sentiment crop using Stampin' Dimensionals.


Today's card was inspired by the following challenges:


Keep Austin Crafty!

Sunday, February 24, 2019

Card: Butterflies All Over!

Hello and Welcome! 

A happy Sunday to all of you out there! I was inspired today by the beautiful Botanical Butterfly Designer Series Paper.  I love when you can create a card and let the paper do the work for you!  The paper in this series is so versatile and lovely that it is quickly becoming a favorite of mine.  

And here is today's card...


Today's card happened to fit perfectly with this week's TGIF Challenge as well! Love when that happens!


Step-by-step instructions:

1.)  Start with a piece of Old Olive card stock cut to 5 1/2" x 4 1/4" as the card base.  
2.) Crop a piece of Whisper White card stock with the largest rectangle die cut and a piece of Botanical Butterfly card stock with the 2nd largest die cut in the Rectangular Stitched die cut framelits.  
3.)  Using one of the smaller rectangle die cuts cut out a framed area from the DSP for the sentiment stamp.  
4.)  Stamp the sentiment in Tuxedo Black ink.  

Here is a close up of the sentiment.  I used a stamp from an old Paper Pumpkin kit.  It has always been one of my favorites because of the subtle outline around the sentiment.    


And best of all?!?  You can get this beautiful paper for FREE with a $50 purchase during the Stampin' Up! Sale-A-Bration event.  Don't forget to check out all of the wonderful products available during this event! 

Check out the Sale-A-Bration Brochures below! 

20190215_SAB19-2_en-US    20190103_SAB19-1_en-US

Don't hesitate to email me with questions or help with ordering! 

Keep Austin Crafty!