Showing posts with label Sunshine Sayings. Show all posts

Tuesday, March 17, 2020

Card: Clean and Simple Flirty Daisy

Hello and Welcome!

Welcome to today's post! And welcome to ATXPaperHouse! I'm so glad you decided to join me today as I'm sure we are all in a little need of little break from today's news.  I hope that I am able to bring a little joy to your day and know that if I could send a card to all of my readers I would...this is me sending you a virtual greeting card saying "Every little thing is gonna be alright".

And now to today's project...


I joined two challenges today as The Paper Players are hosting a Clean and Simple Challenge that I always have fun with.  I think I used to be quite intimidated by the clean and simple concept because I wasn't sure how to create a beautiful card without adding and adding...and adding embellishments, die-cuts and ink, etc.  But as I create more and more cards, I find that I stick to clean and simple more often than not.  I also find that most of the stamp sets that I purchase are so beautiful on their own that it is easy to simply stamp a sentiment with a small design and you have created a beautiful card.

Today's card features the Daisy Lane and Sunshine Sayings sets.  The Daisy Lane set is so versatile and can be used with a variety of ink colors, so it is a real winner! The Daisy Lane Bundle is still available for purchase and features both the stamps and coordinating punch!  I had a few sheets of Flirty Flamingo cardstock left over from a recent Valentine's Day card class and remember thinking "what am I going to do with all of this Valentine's colored paper?!?"  Look no further than a Spring inspired card! The Flirty Flamingo is the perfect Spring pink, so if you're like me and have a few sheets left don't forget to use it for those cute Easter and Spring cards!


Card Details
Size: 5 1/2 x 4 1/4
Paper: Flirty Flamingo, Whisper White
Stamps: Daisy Lane, Sunshine Sayings
Ink:   Flirty Flamingo, Garden Green, Gray Granite
Tools: Daisy Lane Punch, Rectangle Stitched die-cuts, Beautiful Layers, Subtle Embossing folder
Accessories: From My Heart Faceted Gems

Today's project was inspired by the following challenges:

TGIF Challenges

The Paper Players


Keep Austin Crafty!
------------------------------------------------------------------------------------------------------------------------

Did you like today's post?!  If so, don't forget to...

Tuesday, January 21, 2020

Card: Tee it Up!

Hello and Welcome!

Welcome to today's post! A happy Tuesday to all my readers! The weather in Austin has been fantastic as of late and I thought it was the perfect time to post this card featuring my family's favorite sport...Golf! We love a nice sunny day for golf and I know I have several family members who cannot wait to get my little on the golf course...LPGA here we come! I am ready for her to get on the golf course as well because we are one swing away from knocking lots of important things off of shelves :/  

I thought it was a great time to get ahead on some Birthday or maybe Father's Day cards for the important guys in my life.  And let me tell you that is easy with the all new Country Club Designer Series Paper (#151314).  

And here is today's project...


I started this card with a base of Night of Navy Cardstock and then another layer of Crumb Cake.  Looks to me like water and sand and what a perfect way to showcase the tees and golf balls on the DSP.  I just wanted to let the DSP shine on this one, so overall it was a pretty simple card to create.  You can't really see it in the photo, but I did pop the front layer between the Night of Navy and the Crumb Cake with Stampin' Dimensionals.

And don't forget about the inside of your card! Not one to waste a bit of this DSP, I added a side strip down the inside of the card!   


Card Details
Size: 5 1/2" x 4 1/4"
Paper: Night of Navy Cardstock, Crumb Cake Cardstock, Country Club DSP, Whisper White Cardstock, Real Red Cardstock, Crushed Curry Cardstock
Stamps: Sunshine Sayings, Flowering Desert
Ink: Night of Navy, Crumb Cake
Tools: Layering Circles die-cuts, Banner Punch
Accessories: Linen Twine 

Today's card was inspired by the following challenges:


Keep Austin Crafty!
------------------------------------------------------------------------------------------------------------------------

Did you like today's post?!  If so, don't forget to...
  • Leave a comment below! I love to hear your thoughts on the day's project!
  • Check at the ATXPaperHouse Card of the Month Club!
  • Follow me on Pinterest.
  • Check out my Etsy Shop.   New Listings Just Added! 

Tuesday, November 19, 2019

Card: Fall Birthday

Hello and Welcome!

Welcome to today's post! I hope everyone's week is off to a great start! I don't know about anyone else, but we are certainly counting down the days until Thanksgiving break!  A nice long break is in order for this family and we are hoping for some good weather to go along with it.  

Fall is in the air as we get ready for Thanksgiving and I realized that I had not put together any festive Fall cards yet.  So I got right to work with this fall inspired birthday card.  

And here is today's project...


For this card, I played with the Seasonal Layers die-cuts and boy did I have fun! The die-cuts in this set are so versatile and I love that intricate, larger leaf popping out from behind.  The Soft Suede card base mixed with Crumb Cake and those deep, fall colors really adds to the richness of this card.  

The sentiment is cropped from a piece of Crumb Cake using the "birthday" die-cut from the Well Written die-cut set and the "happy" is heat embossed with white embossing powder.  I am definitely becoming much more comfortable with my heat embossing tool and think I've got it mostly down.  I love the way it adds just a little something special to the cards.  


Card Details
Size: 4 1/4" x 5 1/2"
Paper: Soft Suede, Neutrals 6 " x 6", Whisper White, Crumb Cake, fall colors of your choice
Ink: White Embossing Powder and heat tool
Stamp Set: Sunshine Sayings
Tools: Seasonal Layers die-cuts, Rectangle Stitched die-cuts, Well Written die-cuts
Accessories: Metallic embellishments


Keep Austin Crafty!
------------------------------------------------------------------------------------------------------------------------

Did you like today's post?!  If so, don't forget to...
  • Leave a comment below! I love to hear your thoughts on the day's project!
  • Check at the ATXPaperHouse Card of the Month Club!
  • Follow me on Pinterest.
  • Check out my Etsy Shop.   New Listings Just Added!  

Tuesday, September 17, 2019

Card: Magnolia Inspiration

Hello and Welcome!

Welcome to today's post! I hope everyone's week is off to a great start! It is starting to show some hints of fall here in Austin, TX and by hints I mean the temperature has only been 97 degrees rather than 103 degrees!!!  We are scheduled to get some much needed rain, but you never know with Texas weather.  My plants sure could use a good soaking that's for sure! 

Because my outdoor gardens are in dire need of rain water and not producing any beautiful flowers for me to look at I decided to add some flower beauty to today's card! Every time I use this suite it just gets more beautiful!    

And here is today's project...


Aren't those magnolias gorgeous?! The sentiment section is popped and wrapped with Magnolia Lane ribbon for that extra touch.  I have been working with my Stampin' Blends more and more and love how the colored magnolias turned out both on the front and on the inside of the card (see below).  I added the stamped leaves on the envelope of course (don't forget the envelope!).  

This card went to a lovely new coworker for her birthday! Hope she likes it!


Card Details
Size: 4 1/4" x 5 1/2"
Paper: Mossy Meadow cardstock, Magnolia Lane DSP, Vellum, Whisper White
Ink: Mossy Meadow, Early Espresso
Stamps: Good Morning Magnolia, Sunshine Sayings
Tools: Rectangle Stitched die cut, Magnolia Memory die cut
Accessories: Magnolia Lane ribbon combo pack, Stampin' Blends

Today's card was inspired by the following challenges: 

Simon Says: Monochrome

--------------------------------------------------------------------------------------------------------------------------
Are you ready for the holidays?! The Holiday Catalog is live...


Keep Austin Crafty!
------------------------------------------------------------------------------------------------------------------------

Did you like today's post?!  If so, don't forget to...

Tuesday, August 27, 2019

Card: Clean and Simple

Hello and Welcome!

Welcome to today's post! I hope everyone's week is off to a great start.  Just a quick reminder to cash in those Bonus Days coupon codes if you are still holding on to them.  They expire August 31st and you don't want to lose them!

Today's project is sweet and simple! I needed a little sweet and simple in my life as it has been quite the adventure lately! I (somewhat) unexpectedly re-joined the workforce and have been so busy getting used to our new routine! New job, new school for my little = one crazy mama! But things are starting to settle down and I finally had some quiet time this weekend to create.  And boy was it needed.  It amazes me how much "crafting" and "creating" can just quiet the soul and give you time to reflect on everything that may be happening in your life.  I took my quiet time and created a card that I thought spoke to my quiet side.

And here is today's project...


The daisies! So simple, so sweet, so perfect! Usually when I think "clean and simple", I think lots of white.  But today I thought I would change that up and focused on a Crumb Cake background to really help the Powder Pink daisies pop.  Just one simple sentiment and this sweet, little card was finished.  Oh, but don't forget that touch of linen twine! This is the first card that I have ever done with the twine wrapped around the inside of the card and I think I will be using this a lot in the future.  I love how it gives it that extra "gift" look.


Card Details
Size: 4 1/4" x 5 1/2"
Paper: Crumb Cake, Whisper White
Ink: Crumb Cake, Powder Pink
Stamp Set: Sunshine Sayings, Daisy Lane
Tools: Pinewood Plank embossing folder, Rectangle Stitched die cut, Medium Daisy Punch, Beautiful Layers die cut
Accessories: Linen Twine

Today's card was inspired by the following challenges:

SUO Challenges -


Keep Austin Crafty!
------------------------------------------------------------------------------------------------------------------------

Did you like today's post?!  If so, don't forget to...


Tuesday, June 25, 2019

Card: Daisy Lane

Hello and Welcome! 

Welcome to today's post! I am excited to share a project today featuring the all new Daisy Lane Bundle.  The new bundle consists of the Daisy Lane stamp set and coordinating Medium Daisy Punch.  It is a wonderful new set and I think a great compliment to the previous Daisy Delight set.  Don't forget that these sets can be used together to create some beautiful and lovely cards!

And here is today's card...


Aren't those flowers just lovely?! I found the medium daisy punch easy to use and the punched flowers were the perfect size for a standard A2 size card.  I needed to make a birthday card for a dear friend, so I combined the Daisy Lane set with the Sunshine Sayings set for the perfect sentiment.  The background stamp is also from the Daisy Lane set and if you know me then you know I love stamping my own background paper.  The fern stamp is perfect for creating that background visual.  

Tip:  So next on my wish list is a "label" punch (maybe the Everyday Label or Timeless Label...do you have a favorite?), but until then I've been doing some improvising.  So here is my tip...stamp the sentiment on a 2 1/2" x 1" piece of Whisper White cardstock.  Using the smallest Layered Circles die-cut, position the die-cut on the corner of the cardstock approximately 1/4" in and run through your die-cut machine creating a rounded out edge.  Repeat the prior step for each of the corners and Viola! a homemade labeled sentiment!


Card Details:
Size: 4 1/4" x 5 1/2"
Paper: Early Espresso, Mossy Meadow, Vellum, Whisper White
Ink: Early Espresso, Mossy Meadow, Powder Pink
Stamp Set: Daisy Lane, Sunshine Sayings
Tools: Rectangle Stitched die-cut, Medium Daisy Punch, Magnolia Memory die-cut, Layered Circle die-cut
Accessories: Linen Thread, bling of choice ;)

Today's card was inspired by the following challenge:


Keep Austin Crafty!
------------------------------------------------------------------------------------------------------------------------

Did you like today's post?!  If so, don't forget to...

Thursday, May 16, 2019

Card: Simple Stamping Card Set

Hello and Welcome! 

Today I wanted to feature a #simplestamping project.  I had so much fun working with the mini pizza box as well that I decided to feature it again in today's project.  I showcased a project using the mini pizza box in a previous post that you can check out here.  

The mini pizza box measures 3.5" x 3.5" when folded and it is the perfect size for holding a 3" x 3" card and matching envelope.  This card set features 5 cards and matching envelopes using three different ink colors.  

And here is today's project...


These cards are so simple to make and they still make a statement.  Again, each card measures 3" x 3" and I stamped the outside of each envelope for added decoration.  A simple enamel dot finishes off the card.  I decorated the outside of the mini pizza box with a similar look, but added an additional circle die cut to pop the flower on the top of the box.  


Card Details

Size: 3" x 3"
Paper: Crumb Cake, Whisper White
Ink: Dapper Denim, Sweet Sugarplum, Powder Pink
Stamp Set: Sunshine Sayings
Tools: 2" circle punch
Accessories: Enamel Dots, white satin ribbon

Keep Austin Crafty!
------------------------------------------------------------------------------------------------------------------------

Did you like today's post?!  If so, don't forget to...


Thursday, April 25, 2019

Card: You are the Best!

Hello and Welcome!

Welcome to today's post.  So if you read last week's posts, you know how much I love Fresh Fig.  Well, here we go again with Fresh Fig...it's just too good! Today I paired it with the lovely Very Vanilla cardstock and I think I love it even more...is that possible?!

I also tried a new technique called "Paper Piecing" (thank you Paper Players for the challenge).  I'm not sure I picked the best stamp set to work with on this technique, but the technique is definitely one I will try again.  It was fun to use the Designer Series Paper in this way and give the card a little extra texture.  

And here is today's card...


The Fresh Fig against the Very Vanilla really makes the color pop! Add a little velvet ribbon and you have a lovely combination of colors.  So let's get to the details...

The paper piecing technique is used on the side flowers.  I went back and forth on what part of the centerpiece to "pop" with dimensionals and I decided on the sentiment portion itself.  I started by stamping the large flowers (Sunshine Sayings stamp set) on a piece of Very Vanilla cardstock.  I then stamped the same flower image on a piece of Share What You Love DSP.  I fussy cut the stamped DSP image and adhered to the Very Vanilla image using the Fine Tip Glue Pen.  I fussy cut the Very Vanilla image and adhered to the card base using the Fine Tip Glue Pen.  I then stamped additional flower images from the A Big Thank You stamp set to the card base for added detail.  The sentiment and border is stamped in Fresh Fig (obviously!) and adhered to the card base using dimensionals.  

I pulled out my Envelope Punch Board and handmade the matching envelope and included the Share What You Love as the envelope liner.  Finishes the card nicely! 

Card Details
Card Size: 4 1/4" x 5 1/2"
Paper: Very Vanilla, Share What You Love DSP
Ink: Fresh Fig
Stamp Set: A Big Thank You, Sunshine Sayings
Tools: Rectangle Stitched Die Cuts
Accessories: Fresh Fig velvet ribbon, Share What You Love adhesive pearls


Today's card was inspired by the following challenges: 


Keep Austin Crafty!
------------------------------------------------------------------------------------------------------------------------

Did you like today's post?!  If so, don't forget to...
  • Leave a comment below! I love to hear your thoughts on the day's project!
  • Check at the ATXPaperHouse Card of the Month Club!
  • Follow me on Pinterest.
  • Check out my Etsy ShopNEW cards added this week! 
--------------------------------------------------------------------------------------------------------------------------

Clearance Rack

Stampin' Up! Clearance Rack REFRESH! Don't forget to check out the Clearance Rack for the latest deals and steals! These products sell out quickly and are only available while supplies last! Search for Angela Slutz, Texas and click "SHOP NOW"! Happy Shopping!

Thursday, February 21, 2019

Card: Clean and Simple Flowers

Hello and Welcome!

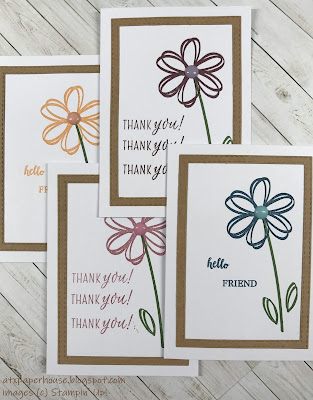
Today's card was inspired the "clean and simple" concept. I was happy that it inspired not just a card, but a whole card set.  The card theme of "clean and simple" really lends itself to being able to snap out some cards pretty quickly, so it was great to put this little set together.  I could keep these simple beauties in my stash or package them up as a sweet gift to a friend.  

And here is today's card...


And here is the set...


Step-by-step instructions
1.)  Start with a piece of Whisper White card stock cut to 3.5" x 4.87" as the card base. 
2.)  Crop a piece of Kraft card stock using the 3rd and 4th largest die cuts in the Rectangle Stitched Die cut set as the frame. 
3.)  Stamp the sentiment and the flower to the front of the card.  
4.)  Add a self-adhesive embellishment to the middle of the flower.  


I choose to highlight the following ink colors: Fresh Fig, Dapper Denim, Peekaboo Peach and Sweet Sugarplum with the embellishment offsetting the shades of the ink colors.  The flower stem is stamped in Garden Green.

Keep Austin Crafty!