Sunday, January 31, 2021

Card: Birthday Blooms

Hello and Welcome! 

Welcome to today's post! I hope everyone is enjoying a wonderful and relaxing weekend.  We are gearing up for a busy week with the start of our first major home renovation...new floors! I am very excited and my dream of turning my home into my very own Fixer Upper (I love all things Joanna Gaines!) is coming to fruition.  Wish us luck! 

In between moving all of our furniture to the garage, I took some time to create this week's card featuring the beautiful Paper Blooms DSP.  

And here is today's project...


This paper is so fun and versatile.  Today I needed a birthday card and I went with this lovely color combination of Gray Granite, Powder Pink and Nigh of Navy.  This is such a perfect color scheme for this paper and I think the subtle touches of pink bring out a softness to the paper.  It's a pretty simple card, but sometimes the simpler the better.  I did decide to "pop" a few of my punched flowers to add a little extra dimension and of course those beautiful From My Heart embellishments give it just the right touch.    

There were lots of different products used for today's card and I love when I can get my use out of so many different sets.  Don't forget a little love for the envelope as well to make sure you're project is complete.  Check out some close ups below!


Card Details
Size: 4 1/4" x 5 1/2"
Paper: Night of Navy, Whisper White, Paper Blooms DSP
Ink: Gray Granite, Night of Navy, Powder Pink
Stamps: Treasured Medallions, Thoughtful Blooms
Tools: Stitched Rectangle die-cuts, small bloom punch, 
Accessories: From My Heart embellishments

Today's project was inspired by the following challenges: 


Marley's Corner!
------------------------------------------------------------------------------------------------------------------------

Check back next week for another addition to Marley's Corner! 


Keep Austin Crafty!
------------------------------------------------------------------------------------------------------------------------

Did you like today's post?!  If so, don't forget to...
  • Leave a comment below! I love to hear your thoughts on the day's project!
  • Want to purchase any of the items used in today's project? Pop on over to my online store using the link on the right! 
  • Follow me on Pinterest.
  • Check out my Etsy Shop.   

Sunday, January 24, 2021

Card: Stitched Valentine's Day

Hello and Welcome! 

Welcome to today's post! Valentine's Day is quickly approaching and I was excited this weekend to pull out my reds and pinks for today's card! I started with a little inspiration from the Stampin' Pretty Sketchbook.  When I saw sketch #19, I couldn't wait to try it out.  I'm loving my new Stitched Shapes die-cuts, so I was thrilled to be able to use these die-cuts in such an innovative way.  You can check out the sketch and the Stampin' Pretty inspiration here.  

And here is today's project...


Isn't this the neatest way to use these stitched squares?! I featured the retired From My Heart DSP for this card and I love the finished product! I was such a fan of this DSP and it was a huge hit when featured during last year's Valentine's Day card making event at my local library.   I still have just a few scraps left and I love when I can put those scraps to use.  I love that I was able to use a nice selection of Valentine's items from the retired DSP to the current Heartfelt stamp set.  

A "Happy Valentine's Day" sentiment surrounded by sweet, little hearts finishes up the project.  Don't forget to add those embellishments for some extra love! 

 
Card Details
Size: 4 1/4" x 5 1/2"
Paper: Flirty Flamingo, Basic White, Real Red, From My Heart DSP
Ink: Real Red
Stamps: Meant to Be, Heartfelt 
Tools: Heart Punch, Be Mine Stitched die-cuts
Accessories: Real Red Satin Ribbon, From My Heart embellishments

Marley's Corner!
------------------------------------------------------------------------------------------------------------------------

Check back next week for another addition to Marley's Corner! 


Keep Austin Crafty!
------------------------------------------------------------------------------------------------------------------------

Did you like today's post?!  If so, don't forget to...
  • Leave a comment below! I love to hear your thoughts on the day's project!
  • Follow me on Pinterest.
  • Check out my Etsy Shop.   

Sunday, January 17, 2021

Card: Step it Up

Hello and Welcome! 

Welcome to today's post! I was so excited to finally pull out the A Touch of Ink set featuring the beautiful and tranquil hummingbird images.  I wasn't quite sure how I would use these stamps when I first saw the set; however, I'm so glad I decided to test them out.  I love how these cards came out.  I decided to do my own "Step It Up" project featuring the stamp set and so took a little inspiration from Stampin' Up's great ideas on how to "Step It Up".

And here is today's project...


The card above was my final card in a set of three.  I started with simple paper, ink and stamps (see below) then added a quick and easy die-cut then moved on to the card you see above that I like to call "everything but the kitchen sink".  The colors featured in today's card are Mint Macaron, Powder Pink, Tuxedo Black and Gray Granite.  I decided to use Versamark ink on the background to create the soft, subtle leaves on the bottom layer.  With each layer, I used the mini dimensionals to pop the cardstock giving each layer some added height. A simple string of white twine adds just the right touch to the front and inside of the card.  I continued the leaf stamp onto the inside with Mint Macaron.    
 

Card Details
Size: 4 1/4" x 5 1/2"
Paper: Mint Macaron, Whisper White, Vellum
Stamps: A Touch of Ink, Make a Difference, Sunshine Sayings
Ink: Mint Macaron, Tuxedo Black, Powder Pink, Versamark, Gray Granite
Tools: Potted Succulent die-cuts, Be Mine die-cuts
Accessories: From My Heart faceted gems, white twine

So now on to the "Step It Up" part...I love how simple this set is.  All you need is paper, ink and stamps to create a clean and simple card.  I've shown all three cards below as well as some individuals of the simpler cards.  

Sunday, January 10, 2021

Card: Flowering Cactus

Hello and Welcome! 

Welcome to today's post! I am excited to share today's creation because I was able to pull out some of my new Stampin' Up! goodies and put them to work.  I started today's project with a little inspiration from a few challenges.  

And here is today's project...


How pretty are those cactus images?!? Today's card features the lovely, new Flowering Cactus product medley.  I love the way this card turned out and I love how the colors came together.  This is the second "cactus" stamp set that I have purchased through Stampin' Up! and I have loved each of the cards put together with these images.  The retired set is known as Flowering Desert and I'm sure I'll be able to pair these sets in future projects!  Don't forget the items you already have on hand - pair them with new items for all sorts of projects.  


 The card features the Flowering Cactus die-cuts as well as the lovely Designer Series Paper.  The sentiments included in the stamp set are too cute and today's card features the "Happy Looks Good On You".  

Sunday, January 3, 2021

New Year...New Cards!

Hello and Welcome! 

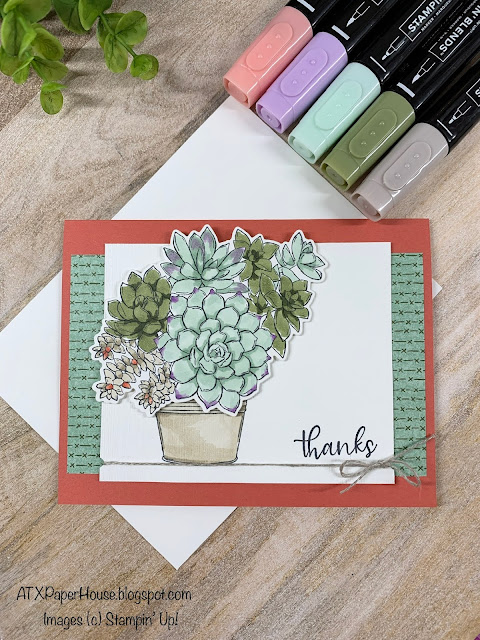
Welcome to ATXPaperHouse and welcome to 2021! We are all so excited to welcome this new year and I am hopeful that 2021 will bring a happier and healthier year.  Until then, let's keep sending our love and support to those around us with beautiful, handmade cards.  Let's start this year off right with a fun and bright card featuring the beautiful Simply Succulents.  

And here is today's project...


When I saw this stamp set, I knew that I would add it to my collection! I have grown to love these large stamps since they allow you to add such beautiful color with the Stampin' Blends.  It did take me several tries to play with the stamp/blend color combinations, but I love how this final product turned out.  Check out some additional close-up photos below. 

I decided to crop out my succulents using the coordinating Potted Succulents die-cuts.  Once they were cropped out, I was able to pop them up using mini dimensionals for some added detail.  It is hard to see in the photos; however, the Whisper White background was run through my Big Shot using the Subtle 3D Embossing folder and I think gives the white cardstock just a little more character.  

Don't forget the inside of your card as well! 


Card Details
Size: 5 1/2 x 4 1/4" 
Paper: Terracotta Tile, Flowering Cactus DSP, Whisper White
Ink: Tuxedo Black Memento Ink, Stampin' Blends (your choice to create a variety of succulent hues)
Stamps: Simply Succulent
Tools: Potted Succulent die-cuts, Subtle 3D Embossing folder
Accessories: Linen Twine

Today's project was inspired by the following sketch challenge...


Marley's Corner!
------------------------------------------------------------------------------------------------------------------------


And today in Marley's corner is a luau themed gingerbread girl :) Thank you to our local Lake Travis Library for providing this lovely make-and-take over the Christmas holidays! Marley had so much fun crafting this beauty! 


Keep Austin Crafty!
------------------------------------------------------------------------------------------------------------------------

Did you like today's post?!  If so, don't forget to...
  • Leave a comment below! I love to hear your thoughts on the day's project!
  • Follow me on Pinterest.
  • Check out my Etsy Shop.