Thursday, February 28, 2019

Card: Can't get enough of those Butterflies

Hello and Welcome!

Today's card was inspired by a few of this week's challenges.  It has been a cold and dreary day here in Austin, so it was the perfect day to snuggle up in my "she shed" and make some cards.  Even my little one is feeling the cold because as I write this she is quietly sitting beside me making her own card.  It's a good day for crafting!

I had to stick with the Botanical Butterfly DSP as a the centerpiece of this card.  The paper is just beautiful and I love using it as the focal point. 

And here is today's card...


Step-by-step instructions

1.)  Start with a piece of Grapefruit Grove cut to 4 1/4" x 5 1/2" as the card base. 
2.)  Trim a piece of Botanical Butterfly DSP to 4" x 5 1/4" and adhere to the card base using snail adhesive. 
3.)  Stamp the sentiment and design from "A Big Thank You" stamp set in Tuxedo Black ink on Whisper White card stock. 
4.)  Crop the sentiment, a piece of Grapefruit Grove card stock and a piece of Basic Black card stock using the Rectangle Stitched Framelits.  Adhere the Grapefruit Grove card stock with snail adhesive.  Add a piece of linen thread underneath the Basic Black card stock before adhering with mini Stampin' Dimensionals.  Adhere the sentiment crop using Stampin' Dimensionals.


Today's card was inspired by the following challenges:


Keep Austin Crafty!

Tuesday, February 26, 2019

Case it UP Tuesday: Share What You Love DSP

Hello and Welcome!

Welcome to CASE it UP Tuesday! Ever see a beautiful card on Pinterest or in a catalog and think "I wish I could make that?!"?  Well, I'm here to tell you that you can! Even the best creative card maker could use a little inspiration sometime, so I have started this bi-weekly post dedicated to CASEing (Copy and Share Everything)!  You can learn to make a card exactly as you see it, use only certain elements (i.e. embellishments and ribbon) or take the layout as a starting point.  What's important is that you take time to create and make something beautiful!  

The inspiration for today's card came from the Stampin' Up! Annual Catalog (pg. 176).  I purchased the Share What You Love DSP as part of my new demonstrator goodies and I love it.  The paper is gorgeous and the coordinating pieces really help to pull everything together.

And here is today's card...


Step-by-step instructions

1.)  Start with a piece of Grapefruit Grove card stock cut to 3 1/2" x 7".  Score at 3 1/2" for a square card base. 
2.)  Emboss with the Lovely Floral Embossing Folder. 
3.)  Attach a piece of Share What You Love DSP cut to 3" x 0.5" across the bottom of the card base.  I choose to cut the edges of that DSP into a "banner" but you could leave it a basic rectangle shape. 
4.)  I manually cut a few of the flowers from the Share What You Love DSP and added them behind the sentiment. 

The technique of "fussy cutting" is new to me and what a great concept it is (thanks Mom!)!!  As someone still building their stock of die cuts and stamps, being able to manually cut the designs straight from the DSP is wonderful.  You can still get that die cut look, your paper colors are perfectly matched and you can use all that beautiful paper.
5.)  Stamp the sentiment in Tuxedo Black ink and crop in the die cut of your choice. 
6.)  Add a bit of linen twine to create a finished look. 

Thanks for stopping by today.  Don't forget about all the great deals going on during Stampin' Up!'s Sale-A-Bration event!

Keep Austin Crafty!

Sunday, February 24, 2019

Card: Butterflies All Over!

Hello and Welcome! 

A happy Sunday to all of you out there! I was inspired today by the beautiful Botanical Butterfly Designer Series Paper.  I love when you can create a card and let the paper do the work for you!  The paper in this series is so versatile and lovely that it is quickly becoming a favorite of mine.  

And here is today's card...


Today's card happened to fit perfectly with this week's TGIF Challenge as well! Love when that happens!


Step-by-step instructions:

1.)  Start with a piece of Old Olive card stock cut to 5 1/2" x 4 1/4" as the card base.  
2.) Crop a piece of Whisper White card stock with the largest rectangle die cut and a piece of Botanical Butterfly card stock with the 2nd largest die cut in the Rectangular Stitched die cut framelits.  
3.)  Using one of the smaller rectangle die cuts cut out a framed area from the DSP for the sentiment stamp.  
4.)  Stamp the sentiment in Tuxedo Black ink.  

Here is a close up of the sentiment.  I used a stamp from an old Paper Pumpkin kit.  It has always been one of my favorites because of the subtle outline around the sentiment.    


And best of all?!?  You can get this beautiful paper for FREE with a $50 purchase during the Stampin' Up! Sale-A-Bration event.  Don't forget to check out all of the wonderful products available during this event! 

Check out the Sale-A-Bration Brochures below! 

20190215_SAB19-2_en-US    20190103_SAB19-1_en-US

Don't hesitate to email me with questions or help with ordering! 

Keep Austin Crafty! 

Thursday, February 21, 2019

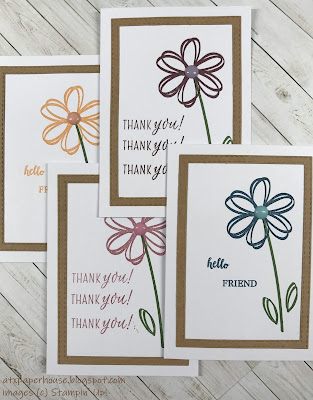
Card: Clean and Simple Flowers

Hello and Welcome!

Today's card was inspired the "clean and simple" concept. I was happy that it inspired not just a card, but a whole card set.  The card theme of "clean and simple" really lends itself to being able to snap out some cards pretty quickly, so it was great to put this little set together.  I could keep these simple beauties in my stash or package them up as a sweet gift to a friend.  

And here is today's card...


And here is the set...


Step-by-step instructions
1.)  Start with a piece of Whisper White card stock cut to 3.5" x 4.87" as the card base. 
2.)  Crop a piece of Kraft card stock using the 3rd and 4th largest die cuts in the Rectangle Stitched Die cut set as the frame. 
3.)  Stamp the sentiment and the flower to the front of the card.  
4.)  Add a self-adhesive embellishment to the middle of the flower.  


I choose to highlight the following ink colors: Fresh Fig, Dapper Denim, Peekaboo Peach and Sweet Sugarplum with the embellishment offsetting the shades of the ink colors.  The flower stem is stamped in Garden Green.

Keep Austin Crafty! 

Saturday, February 16, 2019

Spotlight Saturday: Lovely Floral Embossing Folder

Hello and Welcome! 

A happy Saturday to everyone! I hope everyone had a great week.  We enjoyed a few days of unseasonably warm weather and with a preschooler and Boston Terrier in tow that kind of weather is always welcome! 

In between park dates and dog walks, I managed to craft a few cards using a few of the challenges that were out for the week.  In addition, I wanted to throw the spotlight on a specific product from the Stampin' Up! Annual Catalog.  I choose to focus on the Lovely Floral Dynamic Textured Impressions Embossing Folder for today's card.  You can check this product out on page 176-177 of the Annual Catalog as a part of the Share What You Love suite (which is one of my personal favorites).  It goes along with one of my goals to start using the embossing folders more now that I have my Big Shot (which I also love!).  

So here is today's card...


Step-by-step instructions

1.)  Start with a piece of Basic Black card stock cut to 4 1/4" x 5 1/2" as the card base. 
2.)  Trim a piece of Gray Granite to 4" x 5 1/4". Adhere to the card base with Snail Adhesive.  
3.)  Trim a piece of Fresh Fig card stock to 3 3/4" x 5".  
4.)  Using the Big Shot, emboss the Fresh Fig card stock with the embossing folder.  I did not want to cover up the too much of the flower once the sentiment piece was adhered to the card, so I embossed the paper only about 1/2 from the top of the paper.  The left plenty of blank space at the bottom for the sentiment.  Adhere to the card base with Snail Adhesive. 
5.)  Stamp the sentiment in Tuxedo Black ink on Whisper White card stock.  Using the smallest rectangle stitched die (Whisper White sentiment) and 2nd smallest rectangle die (Basic Black), crop the sentiment section and adhere to the base with mini Stampin' dimensionals.  


6.)  Adhere three self-adhesive pearls to the top right corner.  

This card was inspired by the following challenges...


Keep Austin Crafty!

Thursday, February 14, 2019

Card: Valentine's Love

Hello and Welcome!

I hope all my fellow crafters are feeling the love on this Valentine's Day! I know everyone has been busy making some beautiful Valentine's Day cards and this girl was no exception.  I made today's card for my wonderful hubby. 

This is just a quick post today as I need to get my little ready for her daddy/daughter Valentine's date.  It is the 2nd annual, so it is becoming quite the tradition.  They are super cute when they get all dressed up and it just makes my heart melt!

So here is today's card...

 
The details on this card are just lovely and this is my first card with an embossed background.  I know that is a pretty basic technique, but it is one that I am trying to work on incorporating into more of my cards.  I only have one small and one large embossing plate, so hopefully I can use those a little more often.

The card is a larger one at 5 1/2" x 7" with two layers of cardstock and a overlay of vellum.  The rose die cut is one that I have had in my stash and I thought it went perfect with today's card stock. 

Keep Austin Crafty! 

Tuesday, February 12, 2019

CASE it UP Tuesday: Flowers for a Friend

Hello and Welcome!

Welcome to the first edition of CASE it UP Tuesday! Ever see a beautiful card on Pinterest or in a catalog and think "I wish I could make that?!"?  Well, I'm here to tell you that you can! Even the best creative card maker could use a little inspiration sometime, so I have started this weekly post dedicated to CASEing (Copy and Share Everything)!  You can learn to make a card exactly as you see it, use only certain elements (i.e. embellishments and ribbon) or take the layout as a starting point.  What's important is that you take time to create and make something beautiful!  

Today I have to give credit to the wonderful Mary Fish at Stampin' Pretty.  I have taken her "Let's Giggle with Happiness Blooms" post and applied the A Big Thank You stamp set and Share What You Love DSP.  

Here is today's card...


Step-by-step instructions

1.)  Start with a piece of Old Olive card stock cut to 4 1/4" x 5 1/2" as the card base. 
2.)  Adhere a piece of Whisper White card stock cut to 4" x 5 1/4" to the card base with Snail Adhesive. 
3.)  Adhere three strips of Share What You Love DSP (1" x 4") to a piece of Old Olive card stock cut to 3 1/2" x 4 1/4" with Snail Adhesive. 
4.)  Stamp the sentiment from A Big Thank You stamp set in Fresh Fig ink on Whisper White card stock. 
5.)  Use the Big Shot and 2nd smallest rectangle (Old Olive) and smallest rectangle (Whisper White sentiment) dies from Rectangle Stitched Framelits Dies. Adhere together with Snail Adhesive. Adhere to the card with mini Stampin' Dimensionals. 


6.)  I added some additional embellishments with a twist of copper twine underneath the sentiment section and a few bronze colored sequence.  

Thanks for stopping by today for this quick and easy CASE card!

Keep Austin Crafty! 

Saturday, February 9, 2019

Fresh Flowers

Hello and Welcome!

A happy Saturday morning to all of my fellow crafters!  Today I am sharing a card that was made for my dear old dad as a HUGE Thank You for the work he did to help me create the crafting space that I so lovingly call my "she shed".  As you may know, we recently completed the project to turn my extra closet into a craft space and I could not be happier with how it turned out.  Now I have a special place for all my crafting goodies and a quiet space to create cards like the one I am sharing today.  

Here is today's card...

   
Don't you just love all those beautiful flowers going up the edge of the card?! I tried to bring some real garden aspects into the card as well with a dark background and twine as the embellishment.

Step-by-step instructions

1.)  Start with a piece of Whisper White card stock cut to 4 1/4" x 5 1/2" as the card base.  
2.)  Using the second and third largest die cuts in the Rectangle Stitched Framelits Dies series cut one piece in Soft Suede and one piece in Whisper White card stock.  
3.)  Using the smallest die cut of the Rectangle Stitched Framelits Dies series cut one piece of Whisper White card stock and stamp the sentiment in Fresh Fig ink.  
4.)  Stamp the floral background using the A Big Thank You stamp set in Fresh Fig, Powder Pink and Garden Green ink onto the die cut white card stock.

  
5.)  Wrap with Linen Thread and secure the sentiment and added button embellishment with the Fine Tip Glue Pen.  


6.)  Adhere the layer of Soft Suede card stock with Snail Adhesive and the stamped Whisper White layer with Stampin' Dimensionals.  
7.)  Stamp the corner of the envelope with the matching floral background for added color.  

Reminds me of a lovely spring garden! 

I'll be entering this card into the following challenges: 


Global Design Project #175


Keep Austin Crafty! 

Thursday, February 7, 2019

Beautiful DSP - Gift Set #2

Hello and Welcome!

As promised, I am back today to share the second gift set project that I completed using my new Stampin' Up! goodies.  You can check out my first gift set post here.

Here is the lovely finished product...


Again, hopefully this picture shows up well on everyone's end.  I tried to get it as large as I could so you could see the detail on each of these cards.  You can see the original card in the back, left corner.  I started off making the first two cards with the velvet ribbon and then decided to change it up by adding a pearl adhesive to the last two cards.  It's always fun to make each card stand out in different ways!  Each card also features a different stamp on the "window-like" layer.  I'm a big fan of stamping the paper to create an original background!    

For step-by-step instructions on how to construct these cards, you can see the original post here

Paper: Share What You Love DSP, Share What You Love coordinating cardstock
Ink: Fresh Fig, Crumb Cake or Tuxedo Black
Stamp Set: A Big Thank You
Embellisments: Fresh Fig velvet ribbon, Share What You Love self-adhesive pearls

Keep Austin Crafty!   

Tuesday, February 5, 2019

Beautiful DSP - Gift Set #1

Hello and Welcome!

I hope all my readers had a wonderful weekend! I am back today to share a gift set project that I worked on and completed this last week.  Last Tuesday, I posted a project using the new goodies from my Stampin' Up starter kit (you can check that post out here).  I was so happy with how they turned out that I decided to make a coordinating gift set.

Here is the lovely finished product...


Ok hopefully this picture shows up well on everyone's end.  I tried to get it as large as I could so you could see the detail on each of these cards.  I love how they turned out! You can see the original card in the back, left corner.  The design was so simple and easy to re-create that these cards came together pretty quickly once I got on a roll.  The colors are so rich and vibrant!

For step-by-step instructions on how to construct these cards, you can see the original post here

Paper: Share What You Love DSP, Share What You Love coordinating cardstock
Ink: Fresh Fig, Crumb Cake or Tuxedo Black
Stamp Set: A Big Thank You

Check back Thursday for gift set #2!

Keep Austin Crafty!